Don's Sewing Machines

Est. 1958 - Authorized PFAFF Dealer Since 1966

Home

Pfaff National Promotions

Machines

Creative Icon 2

Performance Icon

Creative 4.5

Creative 3.0

Creative Ambition 640

Expression Machines

Ambition Line

PassPort

Select

Smarter By PFAFF

Singer

Hobbylocks & Coverlocks

Used Machines

Software

Threads

Maderia

Presser Feet

Feet - Quilting

Feet - Sewing

Accessories

Kits & Tool Boxes

Pfaff Creative Hoops

Creative Embroidery Hoops

Stabilizers

Classes

Bed Scarf

Machine Support

CSPro Support

5D Software Support

5D QuiltDesign Support

6D Software Support

Premeir Software Support

Premeir+2 SoftwareSupport

TruEmb Software Support

Inspired By JennyHaskins

JH club Support

Our Dogs

Puppies Day Out

 The Free-motion/Darning Foot is perfect for sewing free-motion embroidery or darning.

1. Make sure the needle is at its highest position.
2. Attach the Darning Foot: with your thumb and finger, squeezing the front and back of the foot together. Insert the pin of the Darning
Foot as far as it will go into the hole at the back of the presser foot holder.
3. The “C-shaped” Guide should be positioned around the presser bar. The long arm must be behind the needle clamp. Tighten the screw.
4. Lower the feed dogs.
5. If you like, you can hoop the project in a round embroidery hoop for more stability.
6. Select a straight stitch and activate the free-motion function, or put the presser foot in the darning/free-motion position.
7. Pull up the bobbin thread and sew a few stitches to secure. Clip the thread ends close to the project and continue sewing.

TIP: Remember, when sewing with the feed dogs lowered, the stitch length is determined by you. An even, medium-to-fast sewing speed
will allow you to sew a more consistent length of straight stitch. Sewing too slowly may cause small knots to appear on the reverse side of your work.

820243-096 *
* except hobby 301, 307 & 309
820282-096 *
* except varimatic 6085, 6086 & 6087


The Open-Toe Free-motion Foot is for wonderful free-motion sewing and quilting. This foot has an extra-large opening cut out in the front to give you an optimal view of your free-motion sewing and quilting.

1. Disengage the IDTTM.
2. Carefully loosen the small silver screw on the back of the presser foot holder until the crosshole is accessible.
3. Squeeze the presser foot gently together and guide the pin of the foot into the crosshole of the presser foot holder as far as it will go. Make sure the clear arm is above the needle clamp.
4. Tighten the silver screw.
5. Lower the Open-Toe Free-motion Foot into the free-motion/ darning position by either selecting the free-motion icon on the touch screen of your machine or manually setting the presser foot lifter in the free-motion position.
6. Lower the feed dogs.
7. Select a straight stitch or a zigzag stitch.
8. Keeping an even speed, manually move your fabric.

Remember, because the feed dogs are lowered, you must move the fabric manually. For even stitches, move your fabric in a smooth, even motion.

Part #820544-096 C D E F G
Part #820780-096 J


---------------------------------------------------------------
The 1/4 inch Quilting Foot is essential for sewing patchwork projects. Its practical markings mean that you can always sew the same distance from the edge of the fabric. Use the professional quilt stitch from your Pfaff sewing machine's stitch repertoire to get beautiful quilted accents with original hand-quilted character. 

1/4 inch Quilting Foot
Part #820883-096
The Clear 1/4 inch Quilting Foot

1/4 inch Quilting Foot with IDT™

A quilt consists of two layers of fabric with a layer of batting sandwiched between them. Many pieces of fabric can be joined together in continually changing patterns to form the top layer of the quilt. The 1/4 inch Quilting Foot is particularly suitable for joining these pieces of fabric.
The clearance between the needle and the outer edge of the foot is 1/4 inch (6.3 mm) and between the needle and the inner edge of the foot 1/8 inch (3.15 mm).

1. Attach the 1/4 inch Quilting Foot.
2. Engage the IDTTM, if available on your machine.
3. Sew fabric together using straight stitch.
4. When using 1/4 inch seam allowance, guide fabric along outer edge of foot. When using a 1/8 inch seam allowance, guide fabric along inner edge of foot.

820211-096 D E G J with IDTTM

820212-096 B C F


The Clear 1/4 inch Quilting Foot is great for joining pieces of fabric as it gives clear visibility when sewing 1/4, 1/8 and 3/8 inch seams. The red lines on the presser foot mark 1/4 inch pivot points in front of and behind the needle.

1. Place two pieces of fabric right sides together.
2. Select straight stitch, stitch length 2.5.
3. Engage IDTTM.
4. Place the fabric under the presser foot. When using 1/8 inch seam allowance, guide the fabric along the inner edge of the toe. When using 1/4 inch seam allowance, guide the fabric along the outer edge of the toe. When using 3/8 inch seam allowance, guide the fabric along the outer edge
of the foot.
5. To pivot 1/4 inch from the end of the fabric, stop sewing when the fabric edge reaches the first red mark on the foot.

Part #820883-096


1/4" Quilting Guide foot
The Clear 1/4 inch Right Guide Foot

1/4 inch Right Guide Foot with IDT™

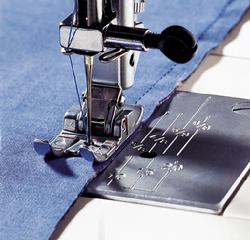
 The 1/4 inch Right Guide Foot is designed to help you achieve perfect 1/4 inch seams when piecing. Simply keep the fabric edge next to the guide.
The distance between the needle and the right guide is 1/4 inch.

The 1/4 inch Right Guide Foot also gives a perfect 1/4 inch topstitch distance from the edge of a block when stitching the blocks, batting
and backing together.
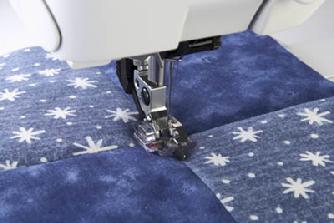
Piecing:
1. Snap on the 1/4 inch Right Guide Foot.
2. Engage the IDTTM.
3. Select a straight stitch.
4. Place the fabric right sides together under the presser foot with the guide at the edge of the fabric.
5. Sew the blocks together, guiding the edges so that it touches the right guide.
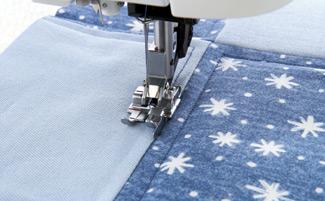
Topstitching:
1. Snap on the 1/4 inch Right Guide Foot.
2. Engage the IDTTM.
3. Select a straight stitch, triple straight stitch or the hand-look straight stitch quilting stitch.
4. Place the quilt under the presser foot with the flange guide in the seam ditch or at the edge of the fabric block.
5. Sew around the block and you will get a perfect 1/4 inch distance from every block edge.

Part # 820541-096


The Clear 1/4 inch Right Guide Foot is designed to help you achieve perfect 1/4 inch pieced seams. Simply guide the fabric edge next to the guide. The clear foot gives great visibility to view when sewing. The distance between the needle and the right guide is 1/4 inch.

Piecing:
1. Snap on the Clear 1/4 inch Clear Right Guide Foot.
2. Engage the IDTTM.
3. Select a straight stitch.
4. Place the fabric right sides together under the presser foot with the guide at the edge of the fabric.
5. Sew the blocks together guiding the edges so that it touches the right guide.

Topstitching:
The Clear Right 1/4 inch Guide Foot also gives a perfect 1/4 inch topstitch distance from the edge of a block when quilting, on your garments or home décor projects. Refer to instruction for the 1/4 inch Right Guide Foot.

Part #820881-096


The Stitch-in-Ditch Foot
Part #820882-096
Clear Stitch-in-Ditch Foot
The Stitch-in-Ditch Foot is designed to help you achieve perfect quilting on the top of your quilt. The guide rides smoothly over the seam for perfect stitching „in the ditch“.
1. Attach the Stitch-in-Ditch Foot.
2. Engage the IDTTM.
3. Select a straight stitch (or another stitch that has a centered needle position like the reinforced straight stitch or the straight stitch hand look quilt stitch).
4. Place the quilt under the presser foot with the guide in the seam (ditch) of the pieced quilt patches.
5. The guide of the presser foot will follow exactly in the center of the pieced seams so you can quilt perfectly.      

Part #820542-096

The Clear Stitch-in-Ditch Foot gives excellent visibility and is designed to help you achieve perfect quilting on the top of your quilt. The guide rides smoothly over the seam for perfect stitching „in the ditch“.

1. Attach the Clear Stitch-in-Ditch Foot.
2. Engage the IDTTM.
3. Select a straight stitch (or another stitch that has a centered needle position like the reinforced straight stitch or the straight stitch hand look quilt stitch).
4. Place the quilt under the presser foot with the guide in the seam (ditch) of the pieced quilt patches.
5. The guide of the presser foot will follow exactly in the center of the pieced seams so you can quilt perfectly.

Parts #820882-096


Please Note!
PFAFF Authorized Dealer Products
can not be Shipped,
Pfaff Product Sales are in-store Only!

Used Machines and Other Items Can be Shipped !

Singer Machines Can be Sold & Shipped!

Pfaff Smarter Machines Can Be Sold & Shipped!